Tag Archives: steadicam

Flycam Flujo: Follow-Up & Summary

17 Jun

Apologies if this is a repeat of previous information, but some of it bears repeating.

The Flycam experiment has essentially ended, as I’ve taken it almost to its breaking point and back. More importantly, I just bought a new arm, so that kinda kills the all-Proaim-testing part of it. I will still have to have an adapter made in order to use that arm, but it’s a Glidecam, which I know works, so it’s not an unknown quantity necessarily.
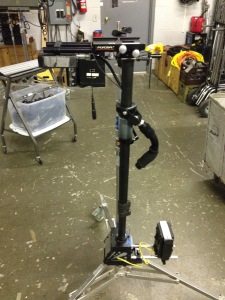
Flycam Flujo ModdedSo how did the Flycam Flujo do? The maiden voyage (well, maiden series) saw it handling a C300 rig pretty regularly, including an unnecessarily heavy “low-mode cage” that damn near killed it. By the end of my run on the season, I had my transitions to and from Steadi down to five and two minutes, respectively, but that isn’t necessarily the Flujo’s doing. I used it effectively and without any equipment-related mishaps (several operator-related ones notwithstanding.) But there are a lot of things that need fixing.

The biggest problem with the entire system is the arm. At some point, probably eight months after buying it (and after about four months of constant usage,) the bearings in the arm started to break. Currently, one of them is completely gone–it must have fallen out on set, and I have no idea when that happened–and the one directly across has shattered. I currently have a steel bolt through the arm where the two bearings are missing, but it’s not the same thickness as the bearings were, and consequently throws off the angle of the first part of the arm pretty severely. Visual inspection reveals that there are several other bearings on the verge of breaking.Modded J-Box
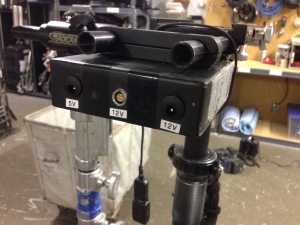
The breaking bearings are probably a fault in the manufacturing, but the entire arm being twisted is not. It’s hard to tell, but the entire arm has torqued ever so slightly outwards, probably because it had a great deal of weight on it. The twist causes the sled to move forward, which makes the operator have to lean back, and down that road lie tears and pulled backs. Varying reports list different weight capacities for the rig, and while my setup was on the heavy end, I’m fairly certain that anyone putting anything on this that was smaller would have a bear of a time figuring out what to do with all that extra inertial energy in the arm. The single-point tension adjustments are very nice, but like many things on this rig, are cheap screws and begin to strip and get loose over time.

So the arm is a serious problem in the long run, even with the modifications I made. The different sizes of post actually helped a considerable amount, and I’m going to have to figure out a way to get that same flexibility in my new arm.

Marrying the HDMI and power with electrical tape.

Marrying the HDMI and power with electrical tape.

The vest is still atrocious, and the sled’s problems were well-documented at the beginning of this series, which is good because I no longer remember what they were. I’ve made quite a few adjustments to the sled, and am currently wiring a new post cable (specifically, HDMI-and-power-tied-together cable.)

But one thing that has absolutely worked is the idea of flexibility. I had the posts and socket-block adapter made so that, when the time came, I could swap an arm, sled, or vest without any other issues. The annoying note here is that I bought a used Glidecam V-25, which actually does have an issue, in that its connection to the vest is incorrect, and I’m having to have another adapter cut at a shop, but that’s only a minor thing. The bones of the system are solid enough to support something like what I’ve done, but it only worked because I have a serious background in this stuff, knew what I wanted, and had operating capital to get it.

All in all, I would not in the least recommend this rig to anyone. It’s been a great deal of trouble, and while it did land me a great job on an amazing set, it’s brought with it a great deal of stress and heartache as things that I shouldn’t have to worry about begin to fail or break.

Flycam Flujo, The Overhaul: Final?!

16 Mar

I just wrapped my first week as an operator on a docu-drama show, shooting in the Hampton Roads area. Two days later, I’m not aching anymore–Days 2, 3, and 4 all found me spending almost all day in the rig. But damn it feels good to be operating all the time! And I did well enough to be offered the position for the rest of the season, shooting ’til October.

So the burning question: how did the Flycam Flujo perform on its first professional gig? The answer: meh.

20140316-082340.jpg

The one major issue I had was that nothing seemed to stay set. I would balance the rig, check my drop time, and when it came back down, it was out of balance. I’m thinking, based on some things I’ve seen online, that the gimbal handle is not at all aligned. The unprofessional nature of the rig means that I have no ability to adjust the thing if it isn’t aligned properly, so it’s just something I’ll have to live with.

But just as important, and just as frustrating, was the fact that the entire top stage was loose. I tightened every nut that I could, and still the entire assembly would shuck and jive. Thankfully not during a take! Just enough during setup to give me far less confidence than I wanted.

20140316-082732.jpg

The materials are cheap–this we all know–but cheap materials can sometimes do great things! Just look at Ford cars. [rimshot!] However, where the cost always becomes a factor is the materials’ ability over time to maintain its function. Here, I fear, is my Flycam’s Achilles–this thing will not last for a very long time, especially if I keep putting it through its paces on this show. Several key adjustment points were stripping out, particularly the side-to-side adjustment on the top stage. Not the threaded adjustment rod, though: just the knob which adjusts it, which is threaded onto the rod and has a tiny set screw, which I’m fairly certain is responsible for the stripping. The clamp that holds the bottom stage on was not staying tight either, and I’m afraid to crank down the screws on that too (see prior.)

Because of the nature of the show, they were looking for considerable amounts of low-mode. To that end, I determined that I needed to make a low-mode cage that I can also use in the future as a weight cage. Because I didn’t mind the weight (and I had less than 12 hours) I went to a machine shop and had a couple of plates of stainless steel cut, then stopped at Lowe’a and bough 3/8″ all-thread and some 3/8-ID tube.

20140316-085554.jpg

This setup, according to the manufacturer, should be well within the weight limits. Perhaps for the arm it is, but the sled itself was really having problems with the great weight. For the next show, I should have my post cable up, which will let me keep weight off the camera by letting me power the Bartech through the J-box. I’ll still probably have the battery on the back for counterbalance handheld. The whole weight cage thing was last minute, so it’ll be very refined by the time I get back in the rig.

Side note: this plate sucks. Notice how only one hole actually lines up?

20140316-144714.jpg

The arm is still holding up, but I’m watching a few screws on it start to tweak and bend. I’ve really pushed it to the limits here. But the additional pins I had made saved me several times, as we got stuck in low mode but needed to raise the camera. I think the parts I had machined are now the strongest parts in it!

I want to talk about how bad the vest is, but it’s been so long since I used a real Steadicam vest that I can remember what it’s supposed to feel like. However, because of my socket block adjustments done to the arm, I can upgrade or rent a different vest anytime, which, given the pay increase from this show, could be sooner rather than later.

The final problem: docking. Or lack thereof–the bracket that comes with the Flycam is an utter farce. So, as you can see from some pictures, I had to build and balance at the same time, sitting on a baby pin (with the 5/8″ insert created for my sled at the machine shop.) All was fine until I needed to put the thing on the arm. Then it became a silly exercise in patience: I’d have to lift the sled with my left arm, holding the handle with my thumb, and then move the arm underneath with my right hand, trying to dock without looking too much a fool.
If I had the low-mode cage on, I had to have an assistant lift the cage so I could get it up high enough. On Saturday morning, my left deltoid was absolutelu destroyed–it took two days to stop hurting.
The only solution is to bite the bullet and go big: as soon as I get back, I’m going to buy a Gorelock 2 docking bracket. It’s worth it, and I can keep this for future rigs, while just buying a new docking ring.

So it seems like this experiment has come to an end, or at least, the end of the beginning. Is this rig workable? Yes, with heavy modification. Some days, I almost wished I was using a Glidecam, but only because of the reliability it has over the Flycam. But here’s what’s important for me: when I got the call about this show, and I told them I was a Steadicam operator who owned a rig, it gave me an opportunity to prove myself. By the third day, I had been offered the position for the rest of the season, even though I’m going to miss three shows. And most importantly, I actually had the knowledge of my equipment to get the job done, despite setbacks in the field.

Will I start upgrading as soon as fiscally possible? Abso-friggin’-lutely.

20140316-125952.jpg